Meta Quest 3
Quick Summary
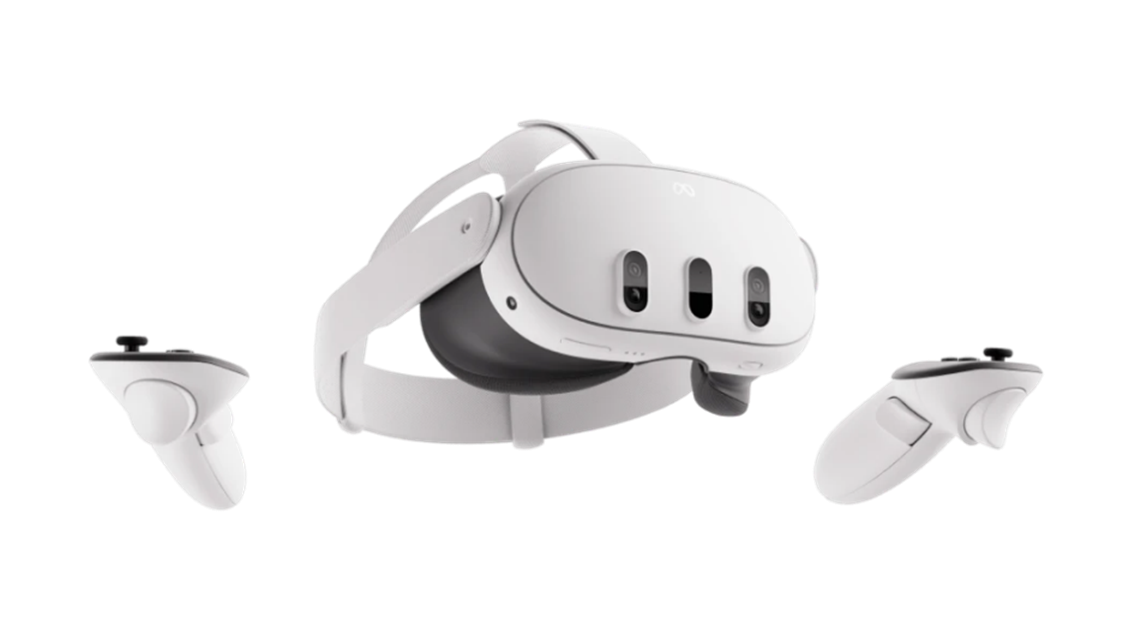
Meta Quest 3 is a standalone virtual reality and mixed reality headset developed by Meta. It can run VR applications wirelessly without an external computer, while also supporting full-colour passthrough for mixed reality experiences. Compared with earlier Oculus Quest devices, Quest 3 provides higher display resolution, improved pancake lenses, stronger processing performance through the Snapdragon XR2 Gen 2 platform, and improved inside-out tracking with Meta Quest Touch Plus controllers. The official Meta product information lists the display resolution as 2,064 × 2,208 pixels per eye, with a field of view of approximately 110° horizontal and 96° vertical.
In VisLab, Meta Quest 3 can be used for immersive design review, VR model viewing, mixed reality demonstrations, SteamVR experiences, and testing spatial interfaces for digital twin or interactive visualisation workflows.
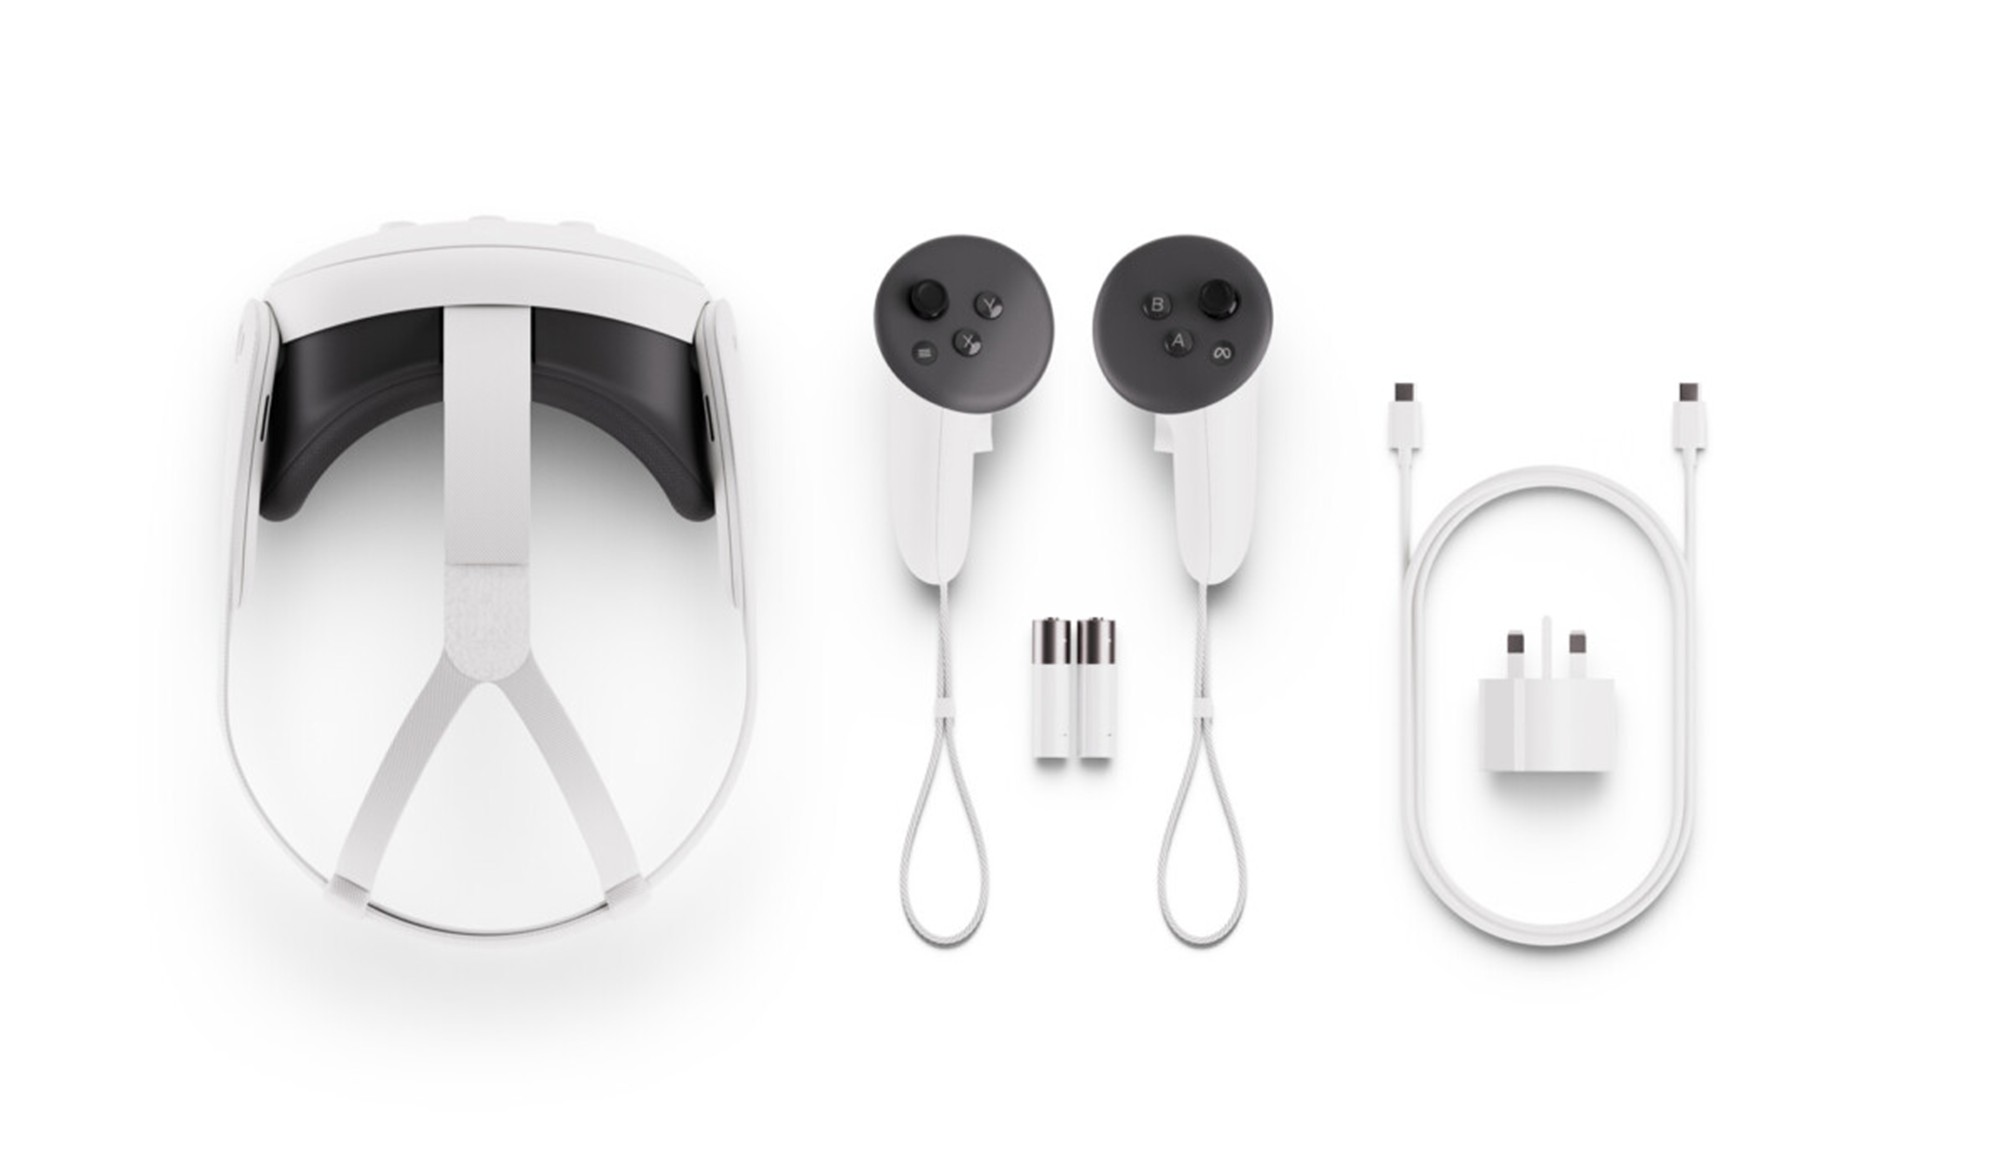
The Kit
The Meta Quest 3 kit will include the following items. Please check that all items are present when borrowing and returning the kit.
● 1 × Meta Quest 3 headset
● 2 × Meta Quest Touch Plus controllers
● 2 × wrist straps
● 1 × adjustable standard facial interface
● 1 × power adapter
● 1 × USB-C charging cable
● 2 × AA batteries for controllers
⚠ | Clear the play area before use. Before using the headset, remove chairs, bags, cables, tables, or any other obstacles from the play area. |
⚠ | Keep the headset lenses away from direct sunlight. Direct sunlight can permanently damage VR headset lenses and internal display components. Store the headset in its case when not in use. |
⚠ | Use wrist straps when using controllers. Attach the wrist straps before starting an interactive VR session. |
⚠ | Be aware of mixed reality and passthrough limitations. Passthrough helps users see the real environment, but it should not replace normal awareness of the physical space. |
Setup
Before the Start
- Charge the headset using the provided USB-C charging cable and power adapter. Meta’s setup guidance recommends fully charging the headset before first use.
- Install the Meta Horizon app on a mobile device if first-time pairing or account setup is required.
- Make sure the headset and controllers are clean and in good condition.
- Check that the play area is clear and suitable for VR use.
Wearing the Headset
- Loosen the head strap before putting the headset on.
- Place the headset over your eyes first, then pull the strap over the back of your head.
- Tighten the strap until the headset feels secure but not uncomfortable.
- Adjust the lens spacing and headset position until the image appears clear.
- If wearing glasses, use the glasses spacer or ensure there is enough clearance between the lenses and glasses.
Turning On the Headset
- Press and hold the power button on the headset until the Meta logo appears.
- Follow the on-screen instructions.
- Use the controllers or hand tracking to select menu items.
Setting up the VR space
Meta Quest 3 uses inside-out tracking, so no external base stations are required. The headset tracks the room through its onboard cameras and sensors.
- When the headset starts, follow the on-screen boundary setup instructions.
- Confirm or redraw the play area boundary.
- Select a stationary or room-scale boundary depending on the activity.
- Stay inside the visible boundary while using VR.
- If the boundary looks inaccurate, reset it before continuing.
Meta’s Quest 3 getting-started resources include boundary setup, passthrough, controller use, headset fit, and charging guidance.
Controllers
The Meta Quest Touch Plus controllers are used to select, point, grab, move, and interact with objects in VR and MR applications.
Typical controller functions:
- Trigger: select, click, or interact
- Grip button: grab objects
- A / X buttons: confirm or select, depending on the app
- B / Y buttons: go back or open app-specific menus
- Meta button: return to the universal menu or recentre view
- Thumbstick: move or navigate in VR applications
Press any button to wake the controllers after turning on the headset. The controllers use AA batteries, which are included in the standard Quest 3 box.
Connect to the WIFI
The Quest 3 requires Wi-Fi for app access, account login, updates, and wireless PC VR workflows.
- Open the universal menu.
- Go to Quick Settings.
- Select Wi-Fi.
- Choose the appropriate network.
- Enter the password and connect.
For VisLab use, make sure the headset and the computer are on the same network when using wireless streaming, Fologram-style workflows, Steam Link, Air Link, or digital twin demonstrations.
Mixed Reality and Passthrough
Quest 3 supports full-colour passthrough, which allows the user to see the physical room while digital content is overlaid in the headset. This is useful for spatial demonstrations, mixed reality interfaces, and checking the real environment before starting a VR session.
To use passthrough:
- Double-tap the side of the headset to switch passthrough on or off.
- Alternatively, open quick settings and select passthrough.
- Use passthrough to check surroundings before walking, adjusting equipment, or passing the headset to another user.
Meta’s support page states that passthrough can be toggled by double-tapping either side of the headset.
PC VR / SteamVR Use
Quest 3 can be used as a standalone headset or connected to a VR-capable computer for PC VR. For VisLab, this is useful when running SteamVR applications, Unreal Engine VR previews, Unity VR projects, or high-performance visualisation tools.
Option 1: Meta Horizon Link / Link Cable
- Install the Meta Horizon Link software on the VR computer.
- Connect the headset to the computer using a suitable USB-C cable.
- Meta states that Link requires a USB-C 3.2 cable supporting at least 5 Gbps.
- Put on the headset and enable Link when prompted.
- Launch the desired VR application from the PC.
⚠ | notes that a high-quality cable capable of data and power is required, with at least 3 metres recommended for practical use. |
Option 2: Air Link
- Make sure the PC and headset are on the same Wi-Fi network.
- Open Quick Settings in the headset.
- Select Link.
- Enable Use Air Link.
- Select the computer and connect.
Meta’s support guidance describes Air Link setup through Quick Controls and the Link menu.
Option 3: Steam Link / SteamVR
Quest 3 can also connect wirelessly to SteamVR through Steam Link. Valve’s Steam Link support page lists the minimum requirements as a computer running Steam and SteamVR, Windows 10 or newer, an NVIDIA GTX 970 or better GPU, and a 5 GHz wireless router.
Basic workflow:
- Install Steam and SteamVR on the computer.
- Install Steam Link on the Quest 3 from the Meta Store.
- Make sure the headset and PC are on the same network.
- Launch Steam Link in the headset.
- Select the PC and complete pairing.
- Open SteamVR and launch the desired VR application.
Cleaning and Returning
- Wipe the headset and controllers with a dry microfiber cloth after use.
- Do not use liquid directly on the lenses.
- Recharge the headset before returning it.
- Check that both controllers, wrist straps, USB-C cable, power adapter, and any accessories are returned to the case.
- Report any damage, missing items, or tracking issues to VisLab staff.
Meta’s cleaning guidance recommends using a dry microfiber cloth after each use and cleaning headset lenses from the centre outward.